TO STAY CONNECTED BETWEEN POSTS FOLLOW ME ON
Instagram @ fortheloveofahouse
Showing posts with label Paint. Show all posts

Tuesday, August 2, 2016

"more" around the house a.k.a. keeping it real...


I really should title this post "trust your gut!"  That said, I have a feeling that I'm going to get some push-back from a lot some of you regarding a recent design decision, but I'm trusting my gut and I'm hoping I can walk you through my design thought process!
As mentioned in my last "around the house a.k.a. keeping it real" post HERE  I said that our next big project was painting the exterior of the farmhouse.  The whole exterior doesn't need painting, just several walls that have taken a beating from our New England winters.  The barn (thankfully for the pocketbook ;) is in good condition.  The barn is stained and the house is painted; the stain has held up much better than the paint (all paint and stain colors are on my sidebar if interested.)  Although we have not done this, it is a common practice here in New England to keep a painter on retainer to come paint one side of your house each year.

The scraping commences.  (f.y.i., that is my antique yogurt pot that stands in the front bed which has been placed on the grass, on it's side, to keep it safe-  it is not one of those half pot thingys that people lay on the ground and plant flowers in :)
Before the scraping, the first thing the painters did was remove all the shutters.


And, unbeknownst to me... I loved it!!!  
I was shocked, but the farmhouse suddenly felt clean, crisp and fresh... and I felt like I could take in a big breath.  Our gorgeous, unusual, antique wavy glass windows suddenly took center stage and the whole house seemed to relax a bit.
I realize this might look a bit naked or unusual if you live in the south or in a metropolitan area, but if you drive through rural New England you will see antique house upon antique house with no shutters.


Before removing the shutters for painting, the windows in the ell between the barn and the farmhouse always bothered me. They didn't have shutters which I liked conceptually since the ell was added after the house and had different windows, but not visually.  But, now that the shutters on the main house are off it all "feels" right to my eye and my gut!  I looked at the house from every angle, close up and at a distance.  After discussing it with Dan, we made the decision of no shutters!  We realized that when we drive around New Hampshire that the antique houses that we are drawn to have a look and a feeling of authenticity and we could now see that the look and feel we loved was the look of our farmhouse without shutters. And hey, I can always put them back if we were to change our minds, but I love the way the house looks and feels.
Before I gave the "no-shutter" word to the painter, I wanted to make sure I was 100% with the decision.  I had the thought that I should look at photos of farmhouses and cottages that I have collected over the last couple of years, and I'll be damned, but literally 99% of them had NO shutters!  Who-knew??!!! I was seriously giggly giddy!  I had just never looked at my saved houses from that perspective.  It was quite a revelation for me and a validation of "trust your gut!"


 The front face after scraping and with the shutters removed.


The house with black shutters.  Classic.  I do think it looks really pretty with shutters, but something about it also seems a bit formal for this simple farmhouse.  When we initially had the whole house painted 7 years ago HERE I remember not being able to get the shutters back on the house fast enough, but thinking about it now the house wasn't landscaped and I was coming from a metropolitan/suburban situation and that was the norm for my eye.  After living here and seeing so many antique houses without shutters my aesthetic for the farmhouse has shifted.  I have taken drive-by photos of antique houses that I love, but can't quite put my finger on what makes me so captivated by them.  I would bet that if I went back to look at all of those houses they wouldn't have shutters!  Don't get me wrong, I love shutters, but for now the house looks and "feels" exactly as it should to me.  
I should also note after getting several comments on the shutters, that the shutters are antique and were original to the house (maybe not to 1853, but perhaps turn of the century?)  The top of the shutters are stationary and the bottoms had movable louvers for air flow.  They were initially operable to close over the windows, but when the storm windows were installed (prior to our owning the house) they were then attached directly to the house.  
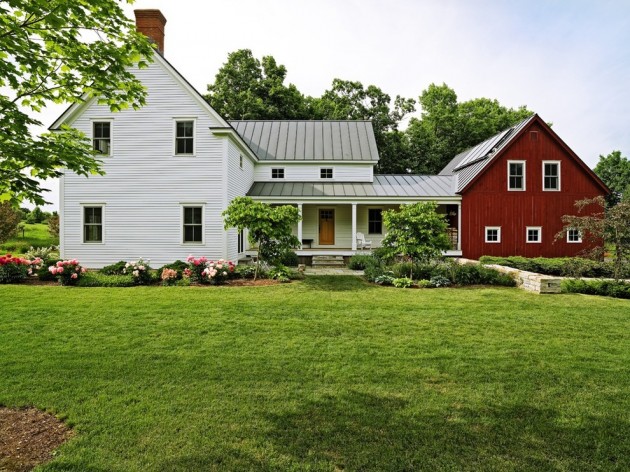
And, yes- the house will be remain white!  As I mentioned in the beginning of this post we are only painting several sides of the house.
 photo by Micheal Partenio


Here are some photos of my saved favorite farmhouses, all of which unbeknowst to me until today do not have shutters!

Martha Stewart...That magic moment first thing in the morning on the Fourth of July!  from...  http://lifeofstyle-lifestyle.blogspot.com/2010/11/thank-you.html:
photo via


 :
photo via


Out on the farm:
photo via


Connor Homes - The Sarah Taylor House II:
photo via


Blackberry Farm,:
photo via


Nora Murphy Country House - Note To Self:
photo via


photo via


Farmhouse Decorating:
photo via


.:
photo via


15 Aesthetic Farmhouse Exterior Designs Showing The Luxury Side Of The Countryside
photo via


peoplecallmejim:
“ Glendalough, Co. Wicklow.
”
photo via


Fotos de casas abandonadas:
photo via

If you would like to read about the history of exterior house shutters this is a really good (and humorous) blog post about them HERE.


Friday, January 7, 2011

Phase II

For the last two months we've been slowly working on Phase II of the farmhouse renovation...
the barn!
During Phase I we added a three-car garage in what is basically the 'basement' of the barn. In Phase I.V (!) we added several windows and a pair of french doors in the barn room, stained the exterior gray, and added an exterior "overhang" above the garage doors.

In this current Phase II we are turning the original, attached barn (it attaches to the farmhouse via the kitchen) into living space... a great room to be specific, or as we have dubbed it-
the barn room!
We are also adding a mud room on the main floor of the barn that connects to the garage below via a new staircase. We are turning the original milking room into a small storage room on the main floor (anyone who has ever lived in an antique house knows that storage space is a rare commodity!) And, we are making an enclosed loft (think office) that sits above the storage and mud rooms.
Phase II is a big project, so I have decided to break it down into several posts to show you what we are working on.
This first post regards the exterior of the barn.

In this Phase II we have added new windows on the
West facing wall that are exact replacements of the original windows and the small-square livestock stall windows! We are moving an antique stone wall to create a graveled terrace accessible from the french doors in the barn room. And, a chimney for the barn room fireplace is being constructed on the east side of the barn between the french doors.
While these exterior projects might sound a bit mundane, to us they are any thing but... for several reasons - The first being that in the middle of winter in New England we are working on exterior projects!! That, in and of itself, is an anomaly! We have had only one minor snowfall (6 inches) so far this year, which has almost all melted away. My excavator and my stonemason do not generally work this time of year....the ground is usually frozen rock-solid by now, but because of the weather we have been able to start both of these exterior projects! We are so thrilled that these projects are being worked on now, instead of having to wait until Spring!

Another reason that makes one of these projects so special, is that the moving of the wall to make the terrace off of the barn room is one of my original visions that I had for this property some four years ago; before we even owned the house! After finding this farmhouse I sat in Dallas for months, as we tried to sell our house, and renovated and remodeled this house over and over in my mind! One of my first thoughts was... "The barn can be a great room and we'll just move that antique stone wall over to the edge of the barn to make a great big terrace." (said in an 'pie in the sky' voice!)
It sounded so simple and easy when I was sitting in Dallas!!
While we have gone through many design ideas with our new (highly recommended, and above board) contractor and his subs- one being a "bunker" for Big Blue built underneath the graveled terrace and accessible from the garage parking pad via antique carriage doors... doable, but out of budget, in the end my original idea plus one amazingly talented, nice (he brings dog cookies to Ella every day) excavator proved to be the best, and most cost-effective solution! To watch this wall being moved stone by stone, and then to see the 'work of art' stone wall being re-constructed is absolutely amazing! Being able to see my 'vision' become reality is a gift beyond measure- for me and this farmhouse, as this wall will certainly stand for hundreds of years to come!

(all photos enlarge when double-clicked; click again to super enlarge)

I thought we would start at the beginning, so you could see the transformation of the barn from the beginning.
This photo was taken on one of first (there were many) visits to the property. The freshly stained barn exterior belies what we found inside!


We have kept the original barn door, and it is going to be placed on a wall inside the barn room as a 'work of art.' This photo shows the stone wall that needs to be moved to the corner of the barn to make the barn room terrace.


This photo shows the original North side of the barn. The gravel path leading to the opened door is the livestock entrance. The two windows on the very bottom are where the garage doors will go... after much digging.


The framed garage doors. Note the level of the dirt on the ground inside the barn that needed to be removed to make it a garage. The grade was lowered two feet.


New garage carriage doors


The framing for the overhang. The overhang was Dan's idea. He wanted it to deflect the rain and snow from the garage doors, and it provides a nice architectural relief to what otherwise is a very large flat plane.


The overhang- mid construction.


The completed overhang.


The house and barn prior to painting and staining, respectively.


The barn room french doors and one North facing window installed. The two square windows above the french doors are our master closet windows. (here)


The second barn room window installed.


The barn being stained gray.


The freshly painted house, and stained barn. In this photo you see the stone wall that will be moved and reconstructed at the corner of the garage/barn to make the barn room terrace.


New windows being installed on the West side of the barn. The top window is the original two over two, and the bottom left is new.


Frames built on-site being added to the new windows.


The beautiful (and energy saving) result!
So that we didn't have to look at raw shingles until we could paint outside in the Spring, the carpenters pre-primed and stained the replacement shingles.


Standing at the barn room french door. The stone wall moments before it is deconstructed- you can see the yellow claw of the excavator in the left side of the door.


Bob, the excavator operator gently lifts this one-ton stone with the ease and grace of an artful surgeon.


Where the wall used to be.


Andre, the stonemason. These granite stones go directly into the barn foundation (now the garage), so they can not be removed and must be cut. Unfortunately for Andre, this is where the chimney will be built!


Andre splitting the granite blocks using a centuries-old technique with tools called "feathers and wedges." It only took him several hours to split these huge stones, so they can be removed- if you can believe that!


Granite stones are now flush with the wall.


Footing is prepared for the base of the chimney.


The concrete being poured into the chimney base.


Smoothing the concrete as the 'peanut gallery' looks on!


Thermal blanket used to protect the freshly poured concrete from the freezing temperatures.


The chimney has arrived! Well, the concrete blocks that will be used to form the housing of the chimney have arrived!


The "cornerstone" of the new stone wall being rebuilt.


The wall will have two tiers and in the end will be slightly over 12 feet tall .


Second course mid-construction (this is only day two and a half of contruction!) When this course of stones is complete it will be the end of the wall project until Spring. Construction of the chimney will continue until complete.


So, that's the barn exterior Phase II! I leave you with a couple of "pretty" pictures!
The house in snow.


Maple shadows on the house.